

BUILDING A DO-IT-YOURSELF RAIN BARREL SYSTEM:
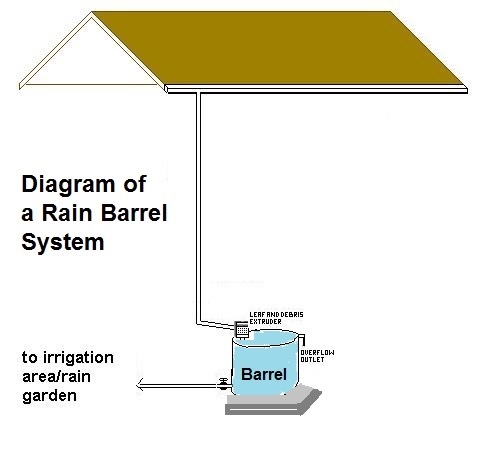 Did you know for every inch of rain a 1,000 square foot roof collects about 600 gallons of water! Building a Rainwater collection system is the perfect DIY project. You can make a rainwater collection system and store hundreds of gallons of water to use for your garden or other non-potable purposes. Every individual effort makes a difference in our scarce water supply--a drop saved is a drop that remains for use in the hydrologic cycle by forests and other plants, fish, wildlife, and people for drinking water.
For this Project You Will Need:
Tools:
· Safety glasses & gloves
· drill,
· hole saws 1”, 2-1/8”, & 2-1/2”
· hack saw for cutting plastic or metal downspout
· measuring tape or ruler
· permanent marking pen or pencil
· screwdriver
· Level
Materials:
· (1) 55-gal. barrel with lid (wood barrel, recycled food grade plastic barrel, or plastic waste barrel)
· (4) standard sized concrete blocks
· (1) ¾” plastic or metal spigot
· (1) Plastic Cooler Drain
· (1) 2 inch x 1-1/2 inch slip x female threaded PVC bushing
· (2) 1-1/2 inch Slip x male threaded PVC adapter
· (1) roll Teflon tape
· (1) tube silicon caulk
· (2) 45 degree downspout elbows that match your existing downspout material & size
· (1) piece of window screen approx. 2-1/2 inches x 21/2 inches
· (2) #8 x ½” Philips head sheet metal screws
Step #1: First select a place for your barrel within 2 ft. of a downspout, preferably on level ground. Place 2 concrete blocks on the ground where you intend the barrel to sit, check to see if the ground is level; if not, dig out some dirt until the blocks are level. Stack the next 2 blocks on top, then add your barrel. You now should have 2 rows of 2 blocks and a barrel resting on top. Lay your level on top of the barrel to see if you need to adjust the blocks to make the barrel level, then adjust if necessary. Next, determine where the top of the barrel will be relative to the downspout--resting the level on the barrel top, slide one end of the level over to the down spout, and mark a reference line of the height on your downspout.
Step #2: Take your barrel off the concrete blocks and place it on sturdy ground. Using the drill with the 2-1/8 inch hole saw cut a hole in the top of your barrel towards the rim making sure the inlet hole is located on a flat or evenly curved surface. Clean away any burr left from cutting. This will be your inlet hole.
Step #3: Next, notice where the front of the barrel will be when the barrel is attached to the downspout. With your tape measure make a mark 3 inches up from the bottom for the spigot hole. Again try to locate this on a flat or evenly curved surface. Use the 1” hole saw to make this hole.
Step #4: Now locate where the overflow outlet will be. Typically, you’ll want this to be located near where excess water can be let out, it also needs to be within 3 inches of the top and on the side of the barrel. Use the 2-1/2 inch hole saw to make this cut. Clean any excess burr material from the hole.
Step #5 You are now ready to assemble your rain catchment barrel. Start by inserting the plastic cooler drain into the 1 inch hole at the bottom of your barrel. I’ve found using a piece of wire or string to be helpful. The cooler drain without the nut on it needs to find its way into the small 1” hole at the bottom of the barrel. Using the string or wire insert it through the top hole and catch it bringing it through the small hole at the bottom. Now you can send the cooler drain piece without the nut on it down the string/wire, you’ll have to fish it through the hole and then holding onto it place the nut and tighten. You can remove the string/wire. Use the Teflon tape on the drain threads after the nut. Thread the spigot onto the end of the drain.
Step #6 Using the same string/wire again, fish one of the 1-1/2 inch Slip x male threaded PVC adapter having the threaded end sticking through to the outside of the barrel. Use some silicone to hold this in place. Now thread on the 2 inch x 1-1/2 inch slip x female threaded PVC bushing tightening as best you can. Let this set up for at least a half hour.
Step #7 Now you can remove the string/wire. Set the 1-1/2 inch Slip x male threaded PVC adapter into silicone in the top hole of the barrel. Allow silicone to set up at least a half hour. The piece of window screen can then be pushed into the center of this fitting. The screen is used to prevent debris and bugs from entering into your barrel.
Step #8 Lastly you need to cut the downspout and fit the (2) 45 degree downspout fittings onto your downspout. Notice where you have made the mark on your downspout. Place the barrel back onto the concrete bricks and putting the (2) 45 degree fittings into each other, making the shape of an S. On the fittings you’ll see one end is fluted with the other end is not. The fluted end goes into the plane end. Now set one end into the top inlet hole of the barrel that is fitted with the PVC adapter, while the other is sitting next to your downspout pointing up towards the gutter. Mark on the downspout 1-1/2 inches down from the top of the fitting. Using a hacksaw cut at this mark. You may need to take the downspout off the wall or remove one pipe hanger to pull the downspout away from the wall to make this cut all the way through. Once you’ve made this cut you can inset the downspout into the 45 degree fitting. The S shape should allow the fittings to bring the downspout over to the barrels inlet fitting. Adjust as needed, then screw in a #8 x ½” sheet metal screw through the fitting into the downspout. Place another screw at the joint of the two fittings. You are now ready to start filling your barrel with rainwater!
If your barrel comes with bung plugs you can modify these instruction by omitting cutting the 2-1/8 inch hole at the top. Instead simply screw in the 1-1/2 inch Slip x male threaded PVC adapter and add your screen.
It’s important to protect against mosquito breeding. Make sure any standing water that does not have a tight mess screen to prevent mosquitos from entering be flushed every 72 hours.
Local suppliers of materials include: Friedman’s Home Improvement, Lowes, Home Depot and Ace Hardware stores.
If you are interested in setting up a multi-barrel system, a very good resource is Blue Barrel Rainwater Catchment Systems www.bluebarrelsystems.com
Barrels can be combined, with one flowing into the next to increase storage, or home owners can decide to build a large rain barrel system (1000 gallons or more). These systems are similar to the school sized projects, and information on school sized systems can also be found on our website Rain Catchers In Your School.